
Tell me you love Zac Efron, without telling me you love Zac Efron. I’ll go first.
One time, Zac Efron went on his Netflix show and showed living walls and so I built a living wall. JK. Kind of.

Let’s rewind a bit.
Last year during Quarantine, Netflix blessed us with some pretty amazing shows. We met Tiger King, fell in love with John B., watched countless hours of trashy reality and watched Zac Efron and Darin Olien try to make the world a better place. Of all the shows I fell in love with last year, Zac Down to Earth was the one that inspired me most to do better, and be better for our planet, and myself. We took so many of their big ideas and tailored them to smaller ideas to live a more sustainable lifestyle in our home. But one idea stuck out more than the rest.
When the episode started with the Living Walls, I turned to Trev and said I WANT ONE OF THOSE. And he looked at me and said “Okay. Draw it up. I’ll build it.”
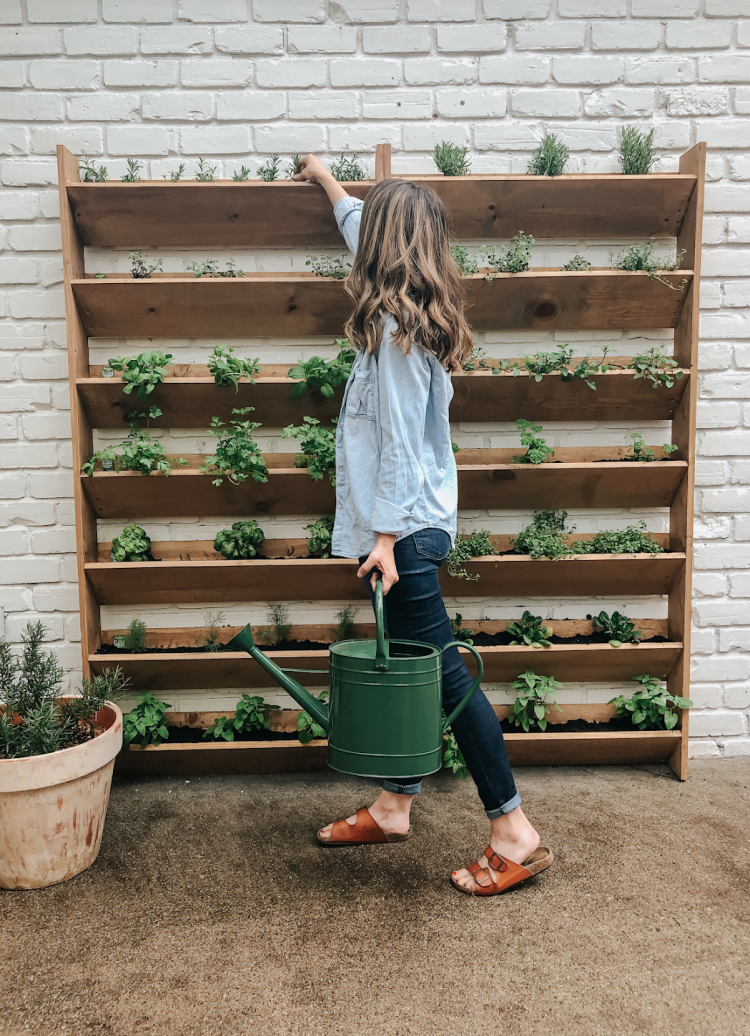
And guys… it turned out better than I could have imagined!

Green Walls, or Living Walls are a way to turn vertical space into gardens and greenery. There are SO many benefits to them. (Seriously, check out a little bit more about them here.) For us, living on a small city lot, this was the perfect solution for us. We’ve got the garden we’ve always wanted but didn’t have to take up precious back yard space we don’t have. And it looks SO PRETTY on our patio!
And guys… we did it for under $150! (That isn’t including the cost of our plants. More on that in a bit.)
Are you wanting to build a vertical garden too? Keep reading, cuz I’ve got Trev with me today to tell you what you’ll need, and how to do it! So, without further ado, here’s my fav wood worker!

Hey guys! When Savannah tells you she screamed “I WANT ONE OF THOSE”, trust me, she did! So, I did what any self-respecting amateur woodworker would do… I hit up Pinterest. I found a bunch of different ways to build a vertical garden but none that matched Savannah’s vision or that worked for where we wanted to put it. Ultimately I took a few ideas from several of the plans I saw, and a few ideas of my own to make her garden dreams come to life.
This was a relatively simple project. You only really need 3 tools and a trip to the Home Depot to get started!
Here’s what you’ll need.
Tools
- Miter Saw (a circular saw and square would work too)
- Drill
- Tape measure
Materials
- 14 – 1″x8″x6′ common boards
- 4 – 1″x6″x6′ common boards
- 1 – 2″x4″x8′ (I had a bunch of scrap 2×4 laying around so I didn’t need to purchase these)
- 1 box each of 1-5/8″ and 2″ exterior wood screws (I grabbed the exterior screws with the hopes that they wont rust over time)
- 1 pack of Tapcon masonry anchors 1/4″x2-1/4″
Since I was using the 1×6 boards as the sides, there was nothing I had to do but cut and attach the supports for the individual garden beds. Using the 2×4, set your miter saw to 45 degrees and start cutting up triangles. In total, you’ll need 28 for both of the vertical gardens (2 per bed). You’ll need to alternate a 45 degree cut and a 90 degree cut as you move along your 2×4. These really don’t need to be precise, but try to make them as uniform as possible.

Next you’ll need to pre-drill for a screw that will eventually attach the support to the side. I just eyeballed the center of the each triangle and ran a hole all the way through it into some scrap wood underneath.

Once you’ve got your triangles predrilled, you’ll lay out the 1×6 and start marking where each bed will rest. I started at the bottom and worked my way up. For this process, I had some scrap 1×8 that I could use as a template for where the beds will attach. I decided to put the backer of the beds behind the sides, rather than between the sides, but I think it would work either way. I laid my scrap piece of 1×8 along the back, then rested the triangle support against that back piece, then took a second 1×8 scrap piece and laid it along the other side of the triangle, creating a V. Then with a quick clamp of the triangle, screwed it into place with the 2″ screws. To get the beds evenly spaced along the 1×6, I did a bunch of math that I won’t bore you with here but ended up measuring up 10-1/2″ from the bottom of each bed. Don’t forget to mark these points on the edge of the side piece.

As you move onto the second side, you’ll need to measure and align the triangle opposite from the first side. That way, you’ll actually be able to attach the bed to the sides. You’re welcome for making that mistake for you.

Now that the sides have the supports, you can cut your 1×8 back pieces. I cut mine to 35″ each, its not exactly half of a 6′ board, but that way you’ll have a consistent size to work with. I set up my miter stand as a stop measured at that 35″ so I could just push the board up against it and make the cut. I didn’t have to measure and mark each time. You’ll need a total of 14 of those backs cut for both of the vertical gardens.

Once all the backs are cut to size, you’ll use the 1-5/8″ screws to attach them to the back. I predrilled and screwed 2 screws on each side of all the backs in before I moved to complete the beds with the front angled piece.

Now that you have the backs attached, flip your vertical garden over so the triangles are exposed. Because the wood I bought wasn’t perfectly straight or square, I decided to measure and cut each front piece individually for that bed. I know it sounds tedious, and trust me it was. But, in the end I was able to deal with any inconsistencies in the wood rather than cutting it all to size then finding that a warp or a twist made my cut too short. I ended up with front pieces anywhere from 33-5/8″ to 33-3/4″. A small variation I know, but I think it helped. Once I had my front piece cut, it was as simple as fitting it into place against the triangle, predrilling a few holes into the triangle, and driving in more 1-5/8″ screws. I also decided later on to go back and add a screw to each of the front pieces from the side, near the face of the vertical garden to support it.

Now that You have 2 vertical gardens it’s time to stain! We used an exterior stain (Behr Premium Semi-Transparent Waterproofing Stain & Sealer in Tugboat) but any color would work. We also decided not to completely stain the inside of the beds, only what we thought would show above the soil. We figured that if we were going to have herbs that we would potentially use in our cooking, we didn’t want any thing from the stain leeching into the soil, then into the plants. We’re not really sure if our thinking made sense here but its something to consider.

Once stained, its time to mount them to the wall. We were mounting ours to a brick wall (the back of the garage), so you may need to research how to mount something to whatever surface you’re working with if its not brick. We set our gardens in place and using a drill bit, drilled 2 holes through the backs of the second from the top and second from the bottom garden beds where our Tapcons would go. You’ll need to take the fronts off these 2 beds for this part. I drilled completely through the wood which left a small mark on the brick. Then I switched to a masonry bit and predrilled those holes into the brick. Once the holes we predrilled, we lined up the vertical gardens again with the holes and drove in the Tapcons. All that was left was to replace the fronts on those few beds and BOOM! You’re ready to plant a vertical garden!
And then… it was back to Savannah to make it pretty.
I spent HOURS trying to figure out exactly what I wanted to plant. I wanted everything to have a use for us, but also to look pretty once it grows out to fill up my wall with green. I ended up choosing a bunch of different herbs and veggies for our garden this year!
We used organic raised bed soil (we used Miracle Grow brand) to fill our beds and then planted 3-4 of each plant depending on their size. We got our plants from different places around us, but all are Bonnie Plants! Here is a list of everything that is in our vertical garden this year.
- Lavendar
- Rosemary
- Thyme
- Catnip
- Italian Parsley
- Dill
- Peppermint
- Spinach
- Sweet Mint
- Oregano
- Curly Parsley
- Sweet Basil
We also planted a pot of peppers to the side!
And guys… that’s it! It was so simple and it looks SO pretty! We can’t wait to see it towards the end of the summer when it’s filled out and thriving. (Hopefully. I’m still pretty worried I’m going to keep it. I’ve never successfully kept a plant alive.)
Do you have a garden? What about a vertical garden? What are your favorite things to plant and grow?! We’re new to the gardening world, so we kept it super simple this year. But I’d love some ideas for next summer!
Alright my loves, we’re signing off for the weekend. I hope you can get out and enjoy some sunshine and warm weather like we plan to!
I’ll be back on Monday.
Xx.
Savannah
PS… for more woodworking content follow Trev on Instagram and Tiktok 🙂
